Inking edges for the cheap and lazy
I'm sure most of you have heard about the magical, mystical powers of Shimelle by now! She is an incredible designer that does a series of youtube videos called Glitter Girl. The series focuses on helping scrappers solve design dilemmas when scrapping and her style is so *her.* One of the hallmarks of Shimelle's style is inked edges. She has this contraption that puts in ink then runs it along the sides of embellishments and papers. I don't know what it's called. Ink edger? Edge inker? Stinky inker? Whatever.
If you had asked me 2 years ago if I would ever consider inking the edges of my embellishments, I would have laughed so hard and said "what's an embellishment?!" But as I keep trying to improve the quality of my scrapping, I found myself needing to ink the edges of an embellishment!
I consider myself a resourceful and cheap (thrifty?) person, so I had to figure out a way to do it on my week twelve layout that didn't involve the purchase of one of those contraptions. I thought to myself "hm... now what can I use to get ink onto paper...?" Well, the answer came to me! A PEN! I COULD USE A PEN! The only problem was that I needed a pen to run along the edges of the paper, instead of drawing on the edges because I am just not that precise. My solution was to use a Sharpie. Yes, a Sharpie. A big Sharpie.
Here is how I did it:
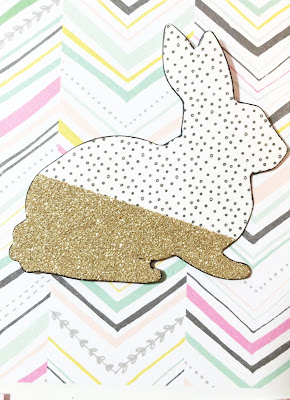
This is approximately where I started. I didn't think to take photos of this until I had already started, so here the bunny is, half-inked. As you can see, the inking on the left really helps the white background of the bunny stand out against the patterned paper with white in it. On the right, the bunny blends in more. It's camouflaged, if you will.
Grab your embellishment and a Sharpie with a wide or flat tip. Use a narrow tip with caution, you might end up just drawing on your embellishment instead of getting it on the edges! Or maybe, unlike me, you have the motor skills of an adult human, and it'll all be fine!
Just keep inking. Just keep inking.
I had to go around twice to get the required amount of coverage.
Here is the finished product in-pocket.
As you can see, it really helps the little bunny stand out on the paper with the white background! I can't see myself investing in a stinky inker anytime soon but I just might try this with a Sharpie again! Hope this helps if you have any edge-inking needs. Thanks for reading!


Great technique. I use sharpies to outline my photos sometimes to save from matting them with black paper.
ReplyDeleteawesome technique! I would have never thought of that!
ReplyDeleteI do that with my Zig markers as well. :)
ReplyDeleteOoooohhhhh what's a zig marker!? Might have to look into that!
Delete